This post aims to present the EveryDrum product. In a nutshell, EveryDrum is a drum trigger signal conditioner interface that is compatible with the Arduino Nano Every, as well as other microcontrollers that share the same pinout.
What is EveryDrum?
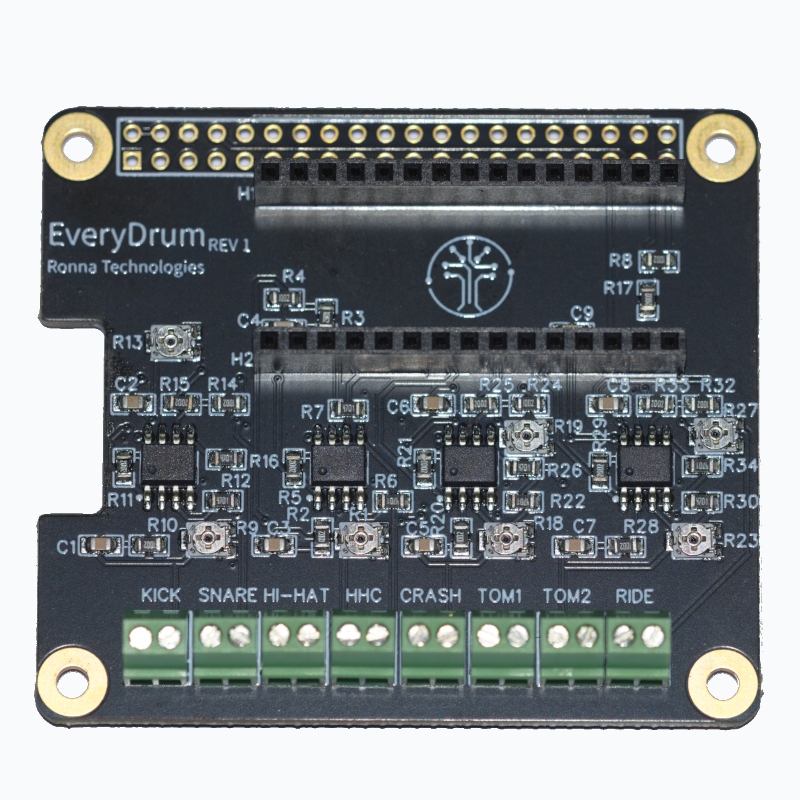
EveryDrum is a drum trigger signal conditioner interface.
One side of the board is to be connected to piezoelectric sensors. The voltage coming from the sensors is transformed in order to be constrained to the 0-3.3V range. This board was initially designed to be used with an Arduino Nano Every, but other pin-compatible boards can be used.
Because the piezoelectric sensors (piezos) output voltages are constrained to the 0-3.3V range. The intended goal of this board is to make a drum module out of an Arduino, but it can be used for many other applications.
Any board that has the form factor of an Arduino Nano, and is pin-compatible, can be used to digitize piezos voltages.
How to use EveryDrum?
Using EveryDrum is fairly simple, you just have to connect your piezos, and optionally one FSR sensor (HHC) to the 8 terminal blocks. Each sensor is connected to the ground on the left side of its terminal block.
Then, you need an Arduino Nano Every, or a pin-compatible board. Connect it to the board using the two 15-pin headers. USB connector should be on the left side of the board.
It's now time to install a firmware on your Arduino.
Instructions are on the GitHub repository. The firmware sends MIDI over USB, but the MIDI messages are received via a serial port. So this is not a USB MIDI device, rather a serial device that sends MIDI messages over a serial port.
From MIDI messages to sounds
This section will be completed in a near future. But for now, the best option is to use eXaDrums. On Ubuntu, Debian or Raspberry Pi OS, you can install it using the following command line: sudo apt install exadrums.
This is a Linux only solution, but there are workarounds for Windows, and probably MacOS too.
Assuming that you have installed eXaDrums, you can go to the "Sensors Config" menu, and select the "SerialMidi" sensor type, and then fill the serial port field. Most of the time the serial port is /dev/ttyACM0, but that depends on your system.
Once that's done, you can configure each instrument of the current kit by setting their MIDI notes. Start eXaDrums, and play drums!
This post aims to present the EveryDrum product. In a nutshell, EveryDrum is a drum trigger signal conditioner interface that is compatible with the Arduino Nano Every, as well as other microcontrollers that share the same pinout.
What is EveryDrum?
EveryDrum is a drum trigger signal conditioner interface.
One side of the board is to be connected to piezoelectric sensors. The voltage coming from the sensors is transformed in order to be constrained to the 0-3.3V range. This board was initially designed to be used with an Arduino Nano Every, but other pin-compatible boards can be used.
Because the piezoelectric sensors (piezos) output voltages are constrained to the 0-3.3V range. The intended goal of this board is to make a drum module out of an Arduino, but it can be used for many other applications.
Any board that has the form factor of an Arduino Nano, and is pin-compatible, can be used to digitize piezos voltages.
How to use EveryDrum?
Using EveryDrum is fairly simple, you just have to connect your piezos, and optionally one FSR sensor (HHC) to the 8 terminal blocks. Each sensor is connected to the ground on the left side of its terminal block.
Then, you need an Arduino Nano Every, or a pin-compatible board. Connect it to the board using the two 15-pin headers. USB connector should be on the left side of the board.
It's now time to install a firmware on your Arduino.
Instructions are on the GitHub repository. The firmware sends MIDI over USB, but the MIDI messages are received via a serial port. So this is not a USB MIDI device, rather a serial device that sends MIDI messages over a serial port.
From MIDI messages to sounds
This section will be completed in a near future. But for now, the best option is to use eXaDrums. On Ubuntu, Debian or Raspberry Pi OS, you can install it using the following command line: sudo apt install exadrums.
This is a Linux only solution, but there are workarounds for Windows, and probably MacOS too.
Assuming that you have installed eXaDrums, you can go to the "Sensors Config" menu, and select the "SerialMidi" sensor type, and then fill the serial port field. Most of the time the serial port is /dev/ttyACM0, but that depends on your system.
Once that's done, you can configure each instrument of the current kit by setting their MIDI notes. Start eXaDrums, and play drums!
To provide the best experiences, we use technologies like cookies to store and/or access device information. Consenting to these technologies will allow us to process data such as browsing behavior or unique IDs on this site. Not consenting or withdrawing consent, may adversely affect certain features and functions.
Functional
Always active
The technical storage or access is strictly necessary for the legitimate purpose of enabling the use of a specific service explicitly requested by the subscriber or user, or for the sole purpose of carrying out the transmission of a communication over an electronic communications network.
Préférences
L’accès ou le stockage technique est nécessaire dans la finalité d’intérêt légitime de stocker des préférences qui ne sont pas demandées par l’abonné ou l’internaute.
Statistics
Le stockage ou l’accès technique qui est utilisé exclusivement à des fins statistiques.The technical storage or access that is used exclusively for anonymous statistical purposes. Without a subpoena, voluntary compliance on the part of your Internet Service Provider, or additional records from a third party, information stored or retrieved for this purpose alone cannot usually be used to identify you.
Marketing
The technical storage or access is required to create user profiles to send advertising, or to track the user on a website or across several websites for similar marketing purposes.